|
|
Post by ncboman on Jul 25, 2005 9:04:19 GMT -5
|
|
|
|
Post by ncboman on Jul 26, 2005 23:58:34 GMT -5
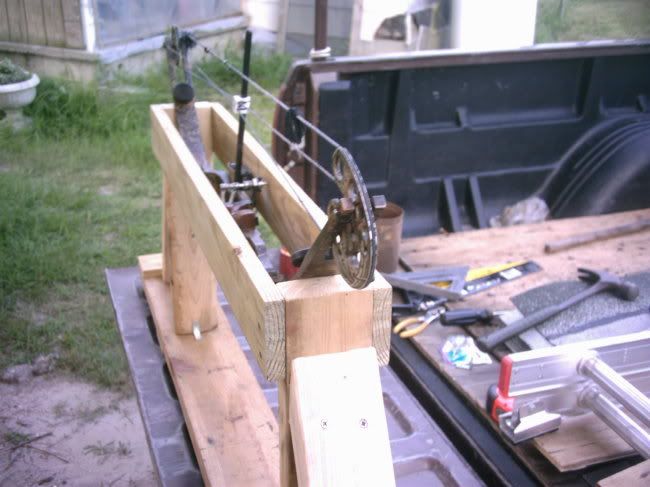
AARG!!!  I gotta make some adjustments. I got the eye bolt put on and the ratchet strap I wanted to use won't easily work as the space is too tight. I could make it work but I'm going to replace the standing 2x4s with longer ones and raise the bow a little. I may have another ratchet strap that'll fit. Before I take it down I'll check. I put the critical parts together with deck screws and corner braces so perhaps it'll come apart without tearing up.  |
|
|
|
Post by WVHunter129 on Jul 27, 2005 7:09:39 GMT -5
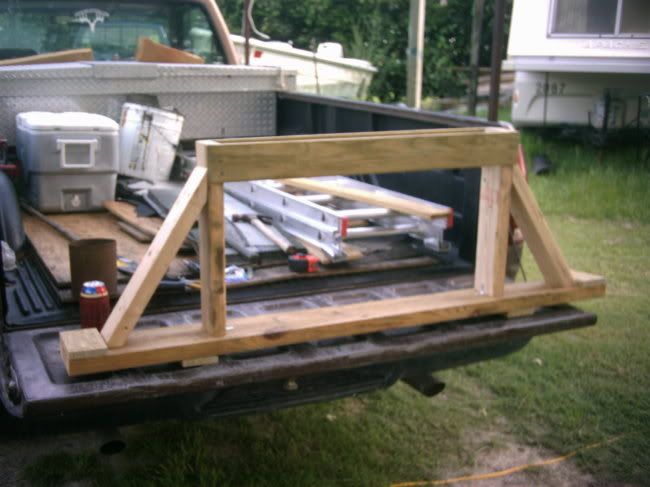
I'm ready for the plans!! Looks good, can't wait to see the finished product with the ratchet strap installed.
|
|
|
|
Post by indianadan on Jul 27, 2005 7:11:20 GMT -5
I know you are great with a bow, so I'm sure you've got this handled. How are you pulling the bow down? With a ratchet strap wrapped around one single point at the riser? If so, aren't you worried about stressing your riser...perhaps twisting it or bending it by putting all the stess on one point of the riser. I've heard of this happening with a pro shop with a "bow technician" who used an Apple bow press incorrectly. I know some bow presses press on the riser, but it is two spots and on the ends near the limb bolts.  Maybe I'm just not getting how you are going about pulling the bow down. |
|
|
|
Post by ncboman on Jul 27, 2005 10:51:40 GMT -5
I'm pulling the bow down from the grip. I already 'pressed' it and it worked fine other than being cramped with the ratchet space. I've been to several bowshops that pulled the bow from the grip so as long as I'm careful to balance the stress on the limbs evenly I hope to be ok. total cost, $2.00 for the eye bolt and washers. I'll post more pics and dimensions once I get the finished product. |
|
|
|
Post by Rock Chuck on Jul 27, 2005 23:17:37 GMT -5
Something else you can do is put wider side boards on it and drill a series of holes through both sides. Use your hand to push the grip down and put a pin though a set of holes over the grip to hold it down.
A way to fancy it up is to get some boat rollers from Kmart or Wally's for the ends. They'll let the limbs roll instead of sliding over the wood and risking scratching the finish.
Dick
|
|
|
|
Post by wvdeerhunter on Aug 23, 2005 16:21:15 GMT -5
A way to fancy it up is to get some boat rollers from Kmart or Wally's for the ends. They'll let the limbs roll instead of sliding over the wood and risking scratching the finish. Dick Or even a piece of some kind of rubber could be laid over the edges of the wood. |
|
|
|
Post by Buckfever on Aug 23, 2005 21:12:13 GMT -5
"A way to fancy it up is to get some boat rollers from Kmart or Wally's for the ends. They'll let the limbs roll instead of sliding over the wood and risking scratching the finish."
I was thinking the same thing and having a series of holes in the crossbeam just like NC has it setup, to slide the boat rollers in or out to accomodate various ATA sizes. Just got to make it taller for more room for the rachet and then come up with something like the picture that Dan put up so that it is dual pull.
What do you think nc, you're the master craftsman here.
|
|
|
|
Post by ncboman on Aug 23, 2005 22:05:27 GMT -5
I've been lazy about taking pics of it since the improvements and now my camera is broke. I have boat trailer rollers the would easily go on it but I honestly think it is unneeded. A pice of carpet or fabric would be a nice touch perhaps. The wood is soft pine and so far has not left any mark on the bow I've been playing with. The movement is quite small on the limbs to take the tension from the strings. I looked it over closely and decided to put some tension on it to see. After a couple of times half tightening it, looking, and checking, I finally went on ahead and put the load on it. I've only worked with the one bow on it but I made it to fit all of ours. I think it will. In a way I like the corners of the (now) 2x6s meet the bow with a small contact line. I don't know, it just makes me feel better when I can see exactly where the pressure is. I guess I could bevel or angle the supports or go with the rollers... maybe just rasp them and cover with something. The rollers I kind of squint at because it's an area something could go wrong. I don't have to worry about that solidly braced board moving or slipping or whatever. In staying away from moving parts and going with a design I know to be solid, I feel the most likely component to fail is the ratchet and that ain't likely. I try to work it with the #1 priority being, not letting anything bad happen to my bow. ;D When I get a digital going again, I'll take some updated pics with the bow pressed. It's a little different now. I took off the angle braces as they aren't needed. replaced the 2x4s with 2x6s and extended them up above the crossbraces. When I find a good scrap 2x12 someplace long enough, I'll replace the base. Wide base is even more stable. Basicly I'm right back to the design I used before, except then I had a boat trailer ratchet screwed to the floor. I didn't like that one as the whole works was always in the way. I had to jig it up off the floor to be able to turn the handle all the way and by the time I finished, it looked like some kind of monument. I was embarrassed for anyone to see it. ;D This one is slightly better and movable.  |
|
|
|
Post by Twanger on Aug 30, 2005 15:01:50 GMT -5
Cool. Please post some pics of the modified rig after you get the new camera.
I've got some spare odd-length lumber laying around that might just work fine.
|
|
|
|
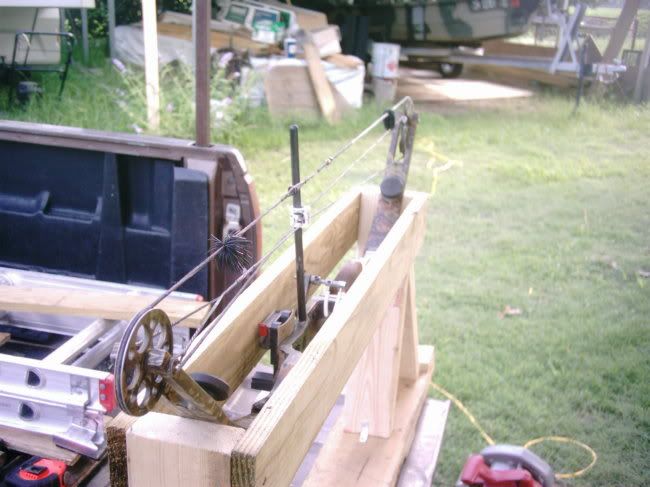
Post by ncboman on Sept 15, 2005 10:34:51 GMT -5
here's a poor quality pic I took with my 35mm showing the upgrade and a pressed bow. 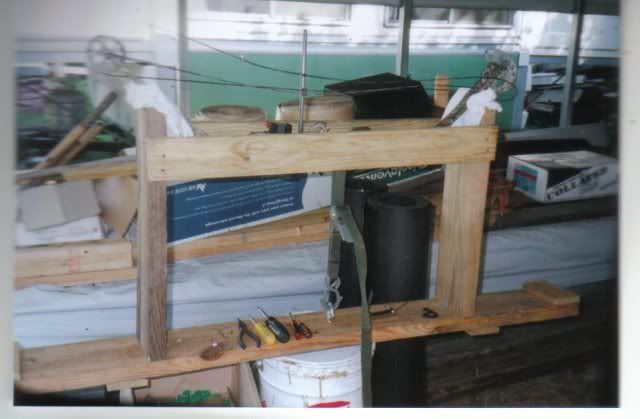 I've got my new digital working now. As soon as I familiarize myself with it, I'll get some better pics as well as items of special note when building your own. |
|
|
|
Post by indianadan on Sept 15, 2005 10:48:58 GMT -5
What do you have on the other side of that eye bolt??  I assume a very large washer to distribute the pressure...... I would have to screw a strip of steel to the bottom of that board and drill a hole through the strip to accomodate the eye bolt. |
|
|
|
Post by ncboman on Sept 15, 2005 11:17:45 GMT -5
Large washer. It is very secure. I tested it beforehand with the strap around (2) 2x4s in place of a bow and was not able to put enough pressure on the ratchet by hand to effect it. I got a large adjustable wrench and put on the ratchet handle for more leverage and when applied, it looked like the ratchet would come apart before the eyebolt even thinks about moving. No way that much pressure would ever be put on a bow. ;D I'll get some better pics and put together a post explaining things in detail. To build one that works perfectly, there are some things that should be noted. I'll explain when I post again to this. It really works great and after the initial fear is overcome, is a breeze to use. |
|


 I assume a very large washer to distribute the pressure......